Here’s an in-depth guide where we break down JsPDF, an open source solution that can help you quickly generate high quality PDFs from HTML.
It’s a PDF world, and we are just living in it.
The ask for this PDF format is universal. And today, we bring you a breakdown of an effective way to convert an HTML Document to a PDF and download it.
No. No! We aren’t talking about the Right-click > Save as PDF option.
This one is much more nuanced.
So let’s dive in!
First things first,
Where did this need to convert an HTML document to a PDF come from?
Most web-based projects or applications need report generation to show relevant data, including PDF conversion. In such cases, generating PDFs with different visibility rules specific to a particular user requires a flexible solution, such as JsPDF.
JSPDF is a JavaScript library that allows you to generate PDF files directly from your web pages. It is a powerful tool for web developers to create and generate PDFs on the fly, making it ideal for businesses, schools, and other organizations that require a way to produce professional and polished PDFs quickly and easily.
Riding on the back of an open-source library and the promise of flexibility, JSPDF allows you to generate PDFs from various sources, including HTML content, images, and even existing PDFs. Being an open-source library, it makes it free to use, modify and accommodate any specific need.
This makes it an ideal choice for developers who need a flexible and cost-effective solution for generating PDFs from their web applications.
Today, we will use jsPDF to download an HTML file as a PDF, images, colors & backgrounds.
PS: Stay tuned for the bonus section towards the end of the blog, which touches upon a presumably difficult use case killing two birds with one stone <PDF edition>.
Let us show you exactly how.
First, let’s set up some basic things to serve our images on the template we will build to implement jsPDF. We will be using AWS S3 Buckets for it.
Setting up an AWS Bucket
This bucket will hold our assets (preferably images) used in our HTML template.
![]()
Here we have our images ready to use now.
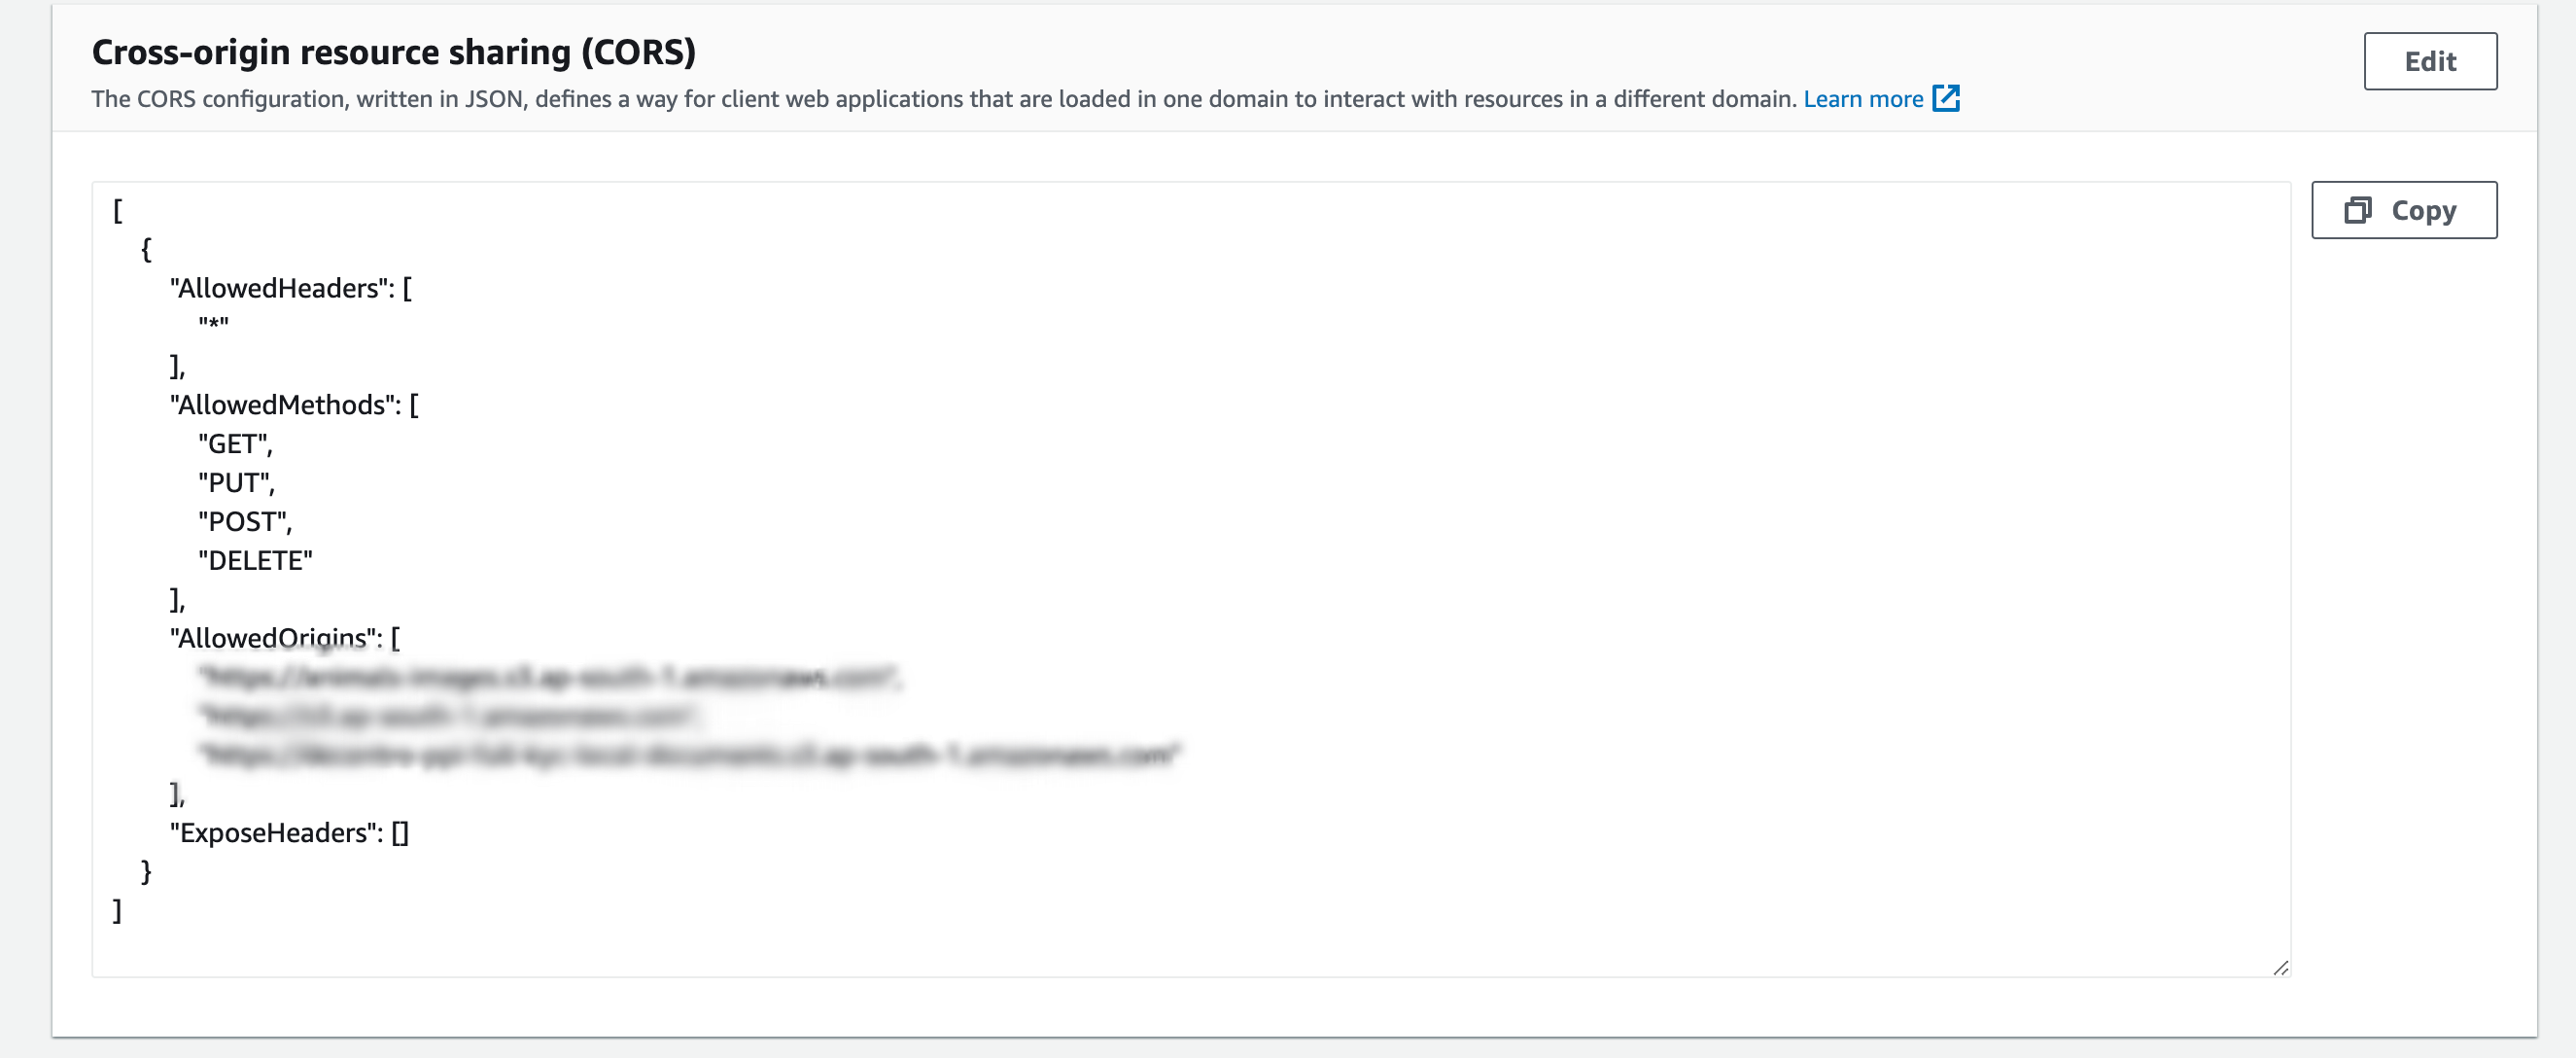
Configuring the Bucket to handle CORS

Wait! What just happened there?
Let me explain!
Since we at Decentro use AWS as our superpower, we have created an S3 Bucket and uploaded all the images we will use in our template.
Then under bucket permissions, we have dumped some CORS policy rules to allow cross-origin requests to our images in the bucket
Now onto setting up the template
HTML Template
We will build a basic HTML template with some sections holding data, background colors, a couple of images & a download button.
Use the code snippet below to build a basic HTML structure.
<!DOCTYPE html> | |
<html lang="en"> | |
<head> | |
<meta charset="UTF-8"> | |
<meta http-equiv="X-UA-Compatible" content="IE=edge"> | |
<meta name="viewport" content="width=device-width, initial-scale=1.0"> | |
<link rel="preconnect" href="https://fonts.gstatic.com" /> | |
<link href="https://fonts.googleapis.com/css2?family=Montserrat:wght@300;400;500;600&display=swap" | |
rel="stylesheet" /> | |
<title>Reports</title> | |
<style> | |
* { | |
font-family: "Montserrat", sans-serif; | |
color: #354052; | |
} | |
html, | |
body { | |
margin: 0; | |
padding: 0; | |
width: 100%; | |
background: url("https://decentro-public.s3.ap-south-1.amazonaws.com/invoice/img/background.png") no-repeat center center fixed; | |
background-size: cover; | |
font-size: 16px; | |
line-height: 16px; | |
position: relative; | |
} | |
button, | |
a { | |
outline: none; | |
cursor: pointer; | |
} | |
h1, | |
h2, | |
h3, | |
h4, | |
h5, | |
h6, | |
p, | |
label, | |
ul, | |
li { | |
margin: 0; | |
padding: 0; | |
} | |
.invoice { | |
max-width: 1200px; | |
margin: 50px auto; | |
padding: 40px 50px; | |
border-radius: 30px; | |
background: #ffffff; | |
box-shadow: 0px 3px 40px rgba(0, 0, 0, 0.05); | |
} | |
.main-container { | |
padding: 30px; | |
width: 100%; | |
background: url(https://decentro-public.s3.ap-south-1.amazonaws.com/invoice/img/background.png) no-repeat center center fixed; | |
background-size: cover; | |
z-index: 100; | |
position: relative; | |
box-sizing: border-box; | |
} | |
.logo-row { | |
width: 100%; | |
display: flex; | |
-webkit-box-pack: space-between; | |
-webkit-box-align: center; | |
align-items: center; | |
justify-content: space-between; | |
} | |
.logo-row img { | |
width: 150px; | |
} | |
.logo-row label { | |
font-size: 1.375rem; | |
font-weight: 600; | |
color: #dfecf5; | |
} | |
.divider-holder { | |
height: 20px; | |
margin-top: 20px; | |
display: -webkit-box; | |
-webkit-box-pack: center; | |
-webkit-box-align: flex-end; | |
justify-content: center; | |
align-items: flex-end; | |
display: flex; | |
} | |
.divider { | |
border-bottom: 1px solid #d2d4d7; | |
width: 100%; | |
} | |
.partner-heading { | |
width: 100%; | |
height: 50px; | |
display: -webkit-box; | |
-webkit-box-pack: center; | |
-webkit-box-align: center; | |
display: flex; | |
justify-content: center; | |
align-items: center; | |
padding: 20px; | |
} | |
.footer-container { | |
margin-top: 20px; | |
text-align: center; | |
display: -webkit-box; | |
-webkit-box-pack: center; | |
-webkit-flex-flow: column; | |
display: flex; | |
flex-flow: column; | |
align-items: center; | |
justify-content: center; | |
} | |
.footer-container>span { | |
font-size: 0.5rem; | |
font-weight: 400; | |
line-height: 1.125rem; | |
color: #354052; | |
} | |
.footer-container img { | |
width: 80px; | |
margin-top: 3px; | |
} | |
.footer-container .footer-text { | |
font-size: 0.75rem; | |
color: #354052; | |
width: 60%; | |
margin-bottom: 8px; | |
} | |
.wallet-details-information { | |
width: 90%; | |
display: -webkit-box; | |
-webkit-box-pack: center; | |
-webkit-box-direction: column; | |
-webkit-box-orient: vertical; | |
display: flex; | |
flex-direction: column; | |
justify-content: center; | |
gap: 10px; | |
border-radius: 20px; | |
padding: 16px; | |
background: #f3faff; | |
} | |
.first-row-container { | |
display: -webkit-box; | |
-webkit-box-pack: space-between; | |
-webkit-box-align: center; | |
display: flex; | |
margin-top: 20px; | |
height: 100%; | |
justify-content: space-between; | |
align-items: center; | |
width: 100%; | |
gap: 10px; | |
} | |
.customer-image-container { | |
width: 37%; | |
height: 90%; | |
display: -webkit-box; | |
-webkit-box-direction: column; | |
-webkit-box-orient: vertical; | |
display: flex; | |
flex-direction: column; | |
margin: 10px; | |
border-radius: 20px; | |
padding: 0px; | |
} | |
.customer-image-container>img { | |
width: 100%; | |
height: 100%; | |
border-radius: 20px; | |
} | |
.wallet-title { | |
padding-left: 7px; | |
} | |
.details-container { | |
display: -webkit-box; | |
-webkit-box-direction: column; | |
-webkit-box-orient: vertical; | |
display: flex; | |
flex-direction: column; | |
gap: 8px; | |
font-weight: 400; | |
padding: 7px; | |
} | |
.detail { | |
display: -webkit-box; | |
-webkit-box-wrap: wrap; | |
display: flex; | |
gap: 8px; | |
font-weight: 300; | |
height: auto; | |
flex-wrap: wrap; | |
overflow-wrap: normal; | |
word-break: break-word; | |
white-space: normal; | |
text-transform: uppercase; | |
} | |
.ckyc-document-image-container { | |
width: 97%; | |
display: -webkit-box; | |
-webkit-box-pack: space-evenly; | |
-webkit-box-direction: column; | |
-webkit-box-orient: vertical; | |
display: flex; | |
justify-content: space-evenly; | |
padding: 22px; | |
background: #f4faff; | |
border-radius: 20px; | |
margin-top: 20px; | |
flex-direction: column; | |
} | |
.ckyc-document-image-heading { | |
padding-bottom: 12px; | |
} | |
.ckyc-document-image-place-holder { | |
height: 83%; | |
width: 98%; | |
display: -webkit-box; | |
-webkit-box-pack: space-between; | |
-webkit-box-align: center; | |
display: flex; | |
justify-content: space-between; | |
gap: 20px; | |
align-items: center; | |
margin-bottom: 10px; | |
} | |
.ckyc-image { | |
width: 50%; | |
height: 100%; | |
} | |
button#button-pdf { | |
display: flex; | |
align-items: center; | |
justify-content: center; | |
width: -webkit-max-content; | |
width: max-content; | |
margin-top: 10px; | |
margin-left: 20px; | |
padding: 15px 30px; | |
font-size: 15px; | |
font-weight: 600; | |
line-height: 16px; | |
border-radius: 100px; | |
color: #fff; | |
border: none; | |
background: transparent linear-gradient(90deg, #3a36c6, #66ceac) 0 0; | |
} | |
.ckyc-image { | |
width: 50%; | |
height: 100%; | |
} | |
.ckyc-image img { | |
max-width: 250px; | |
} | |
</style> | |
</head> | |
<body> | |
<button id="button-pdf">Download</button> | |
<div class="main-container" id="mainContainer"> | |
<div class="invoice before-download" id="ckyc-full-pdf"> | |
<div class="logo-row"> | |
<img src="https://s3.ap-south-1.amazonaws.com/staging.dashboard.decentro.tech/images/partner-image.jpg" | |
alt="Partner Logo" /> | |
<img src=" | |
https://decentro-icons.s3.ap-south-1.amazonaws.com/signup-template/decentro-black.png | |
" alt="Decentro logo" /> | |
</div> | |
<div class="divider-holder"> | |
<div class="divider"></div> | |
</div> | |
<div class="partner-heading"> | |
<div class="span"> | |
<p> | |
<strong class="font-heading-color-size">PARTNER CKYC REPORT</strong> | |
</p> | |
</div> | |
</div> | |
<div class="first-row-container"> | |
<div class="wallet-details-information"> | |
<p class="wallet-title"> | |
<strong class="font-heading-color-size">WALLET DETAILS:</strong> | |
</p> | |
<div class="details-container"> | |
<p class="detail"> | |
<strong class="font-sub-heading-color-size">ENTITY ID:</strong> | |
<span class="font-size-for-value">{{entity_id}}</span> | |
</p> | |
<p class="detail"> | |
<strong class="font-sub-heading-color-size">TITLE:</strong><span | |
class="font-size-for-value">{{title}}</span> | |
</p> | |
<p class="detail"> | |
<strong class="font-sub-heading-color-size">NAME:</strong><span | |
class="font-size-for-value">{{name}}</span> | |
</p> | |
<p class="detail"> | |
<strong class="font-sub-heading-color-size">DATE OF BIRTH:</strong><span | |
class="font-size-for-value">{{date_of_birth}}</span> | |
</p> | |
<p class="detail"> | |
<strong class="font-sub-heading-color-size">GENDER:</strong><span | |
class="font-size-for-value">{{gender}}</span> | |
</p> | |
<p class="detail"> | |
<strong class="font-sub-heading-color-size">PAN:</strong><span | |
class="font-size-for-value">{{pan}}</span> | |
</p> | |
<p class="detail"> | |
<strong class="font-sub-heading-color-size">MOBILE NO:</strong><span | |
class="font-size-for-value">{{mobile}}</span> | |
</p> | |
<p class="detail"> | |
<strong class="font-sub-heading-color-size">EMAIL ID:</strong><span | |
class="font-size-for-value">{{email}}</span> | |
</p> | |
<p class="detail"> | |
<strong class="font-sub-heading-color-size">COMPANY/PROGRAM:</strong><span | |
class="font-size-for-value">{{company}}</span> | |
</p> | |
<p> | |
<strong class="font-sub-heading-color-size">SCREENING REPORT: </strong><span | |
class="font-size-for-value"><a class="screening-report-url" | |
href="https://www.africau.edu/images/default/sample.pdf" target="_blank">CLICK | |
HERE</a></span> | |
</p> | |
</div> | |
</div> | |
<div class="customer-image-container"> | |
<img src="https://decentro-icons.s3.ap-south-1.amazonaws.com/jspdf-blog-customerimage.webp" | |
alt="Transcrop customer" width="100%" height="100%" /> | |
</div> | |
</div> | |
<div class="ckyc-document-image-container" id="ckyc-document-image-place-holder"> | |
<div class="ckyc-document-image-heading font-heading-color-size" style="margin-bottom: 10px"> | |
<strong> DOCUMENTS IN <span>CKYC</span></strong> | |
</div> | |
<div style="margin-bottom: 10px">AADHAAR</div> | |
<div class="ckyc-document-image-place-holder"> | |
<div class="image-1-container ckyc-image"> | |
<img src="https://decentro-icons.s3.ap-south-1.amazonaws.com/jspdf-adhar-image.jpeg" | |
alt="image1" width="100%" height="100%" /> | |
</div> | |
</div> | |
<div class="footer-container"> | |
<span>Powered By</span> | |
<img src="https://decentro-icons.s3.ap-south-1.amazonaws.com/signup-template/decentro-black.png" | |
alt="Decentro logo" /> | |
</div> | |
</div> | |
</div> | |
</div> | |
</body> | |
</html> |
view rawjspdf-sample.html hosted with ❤ by GitHub
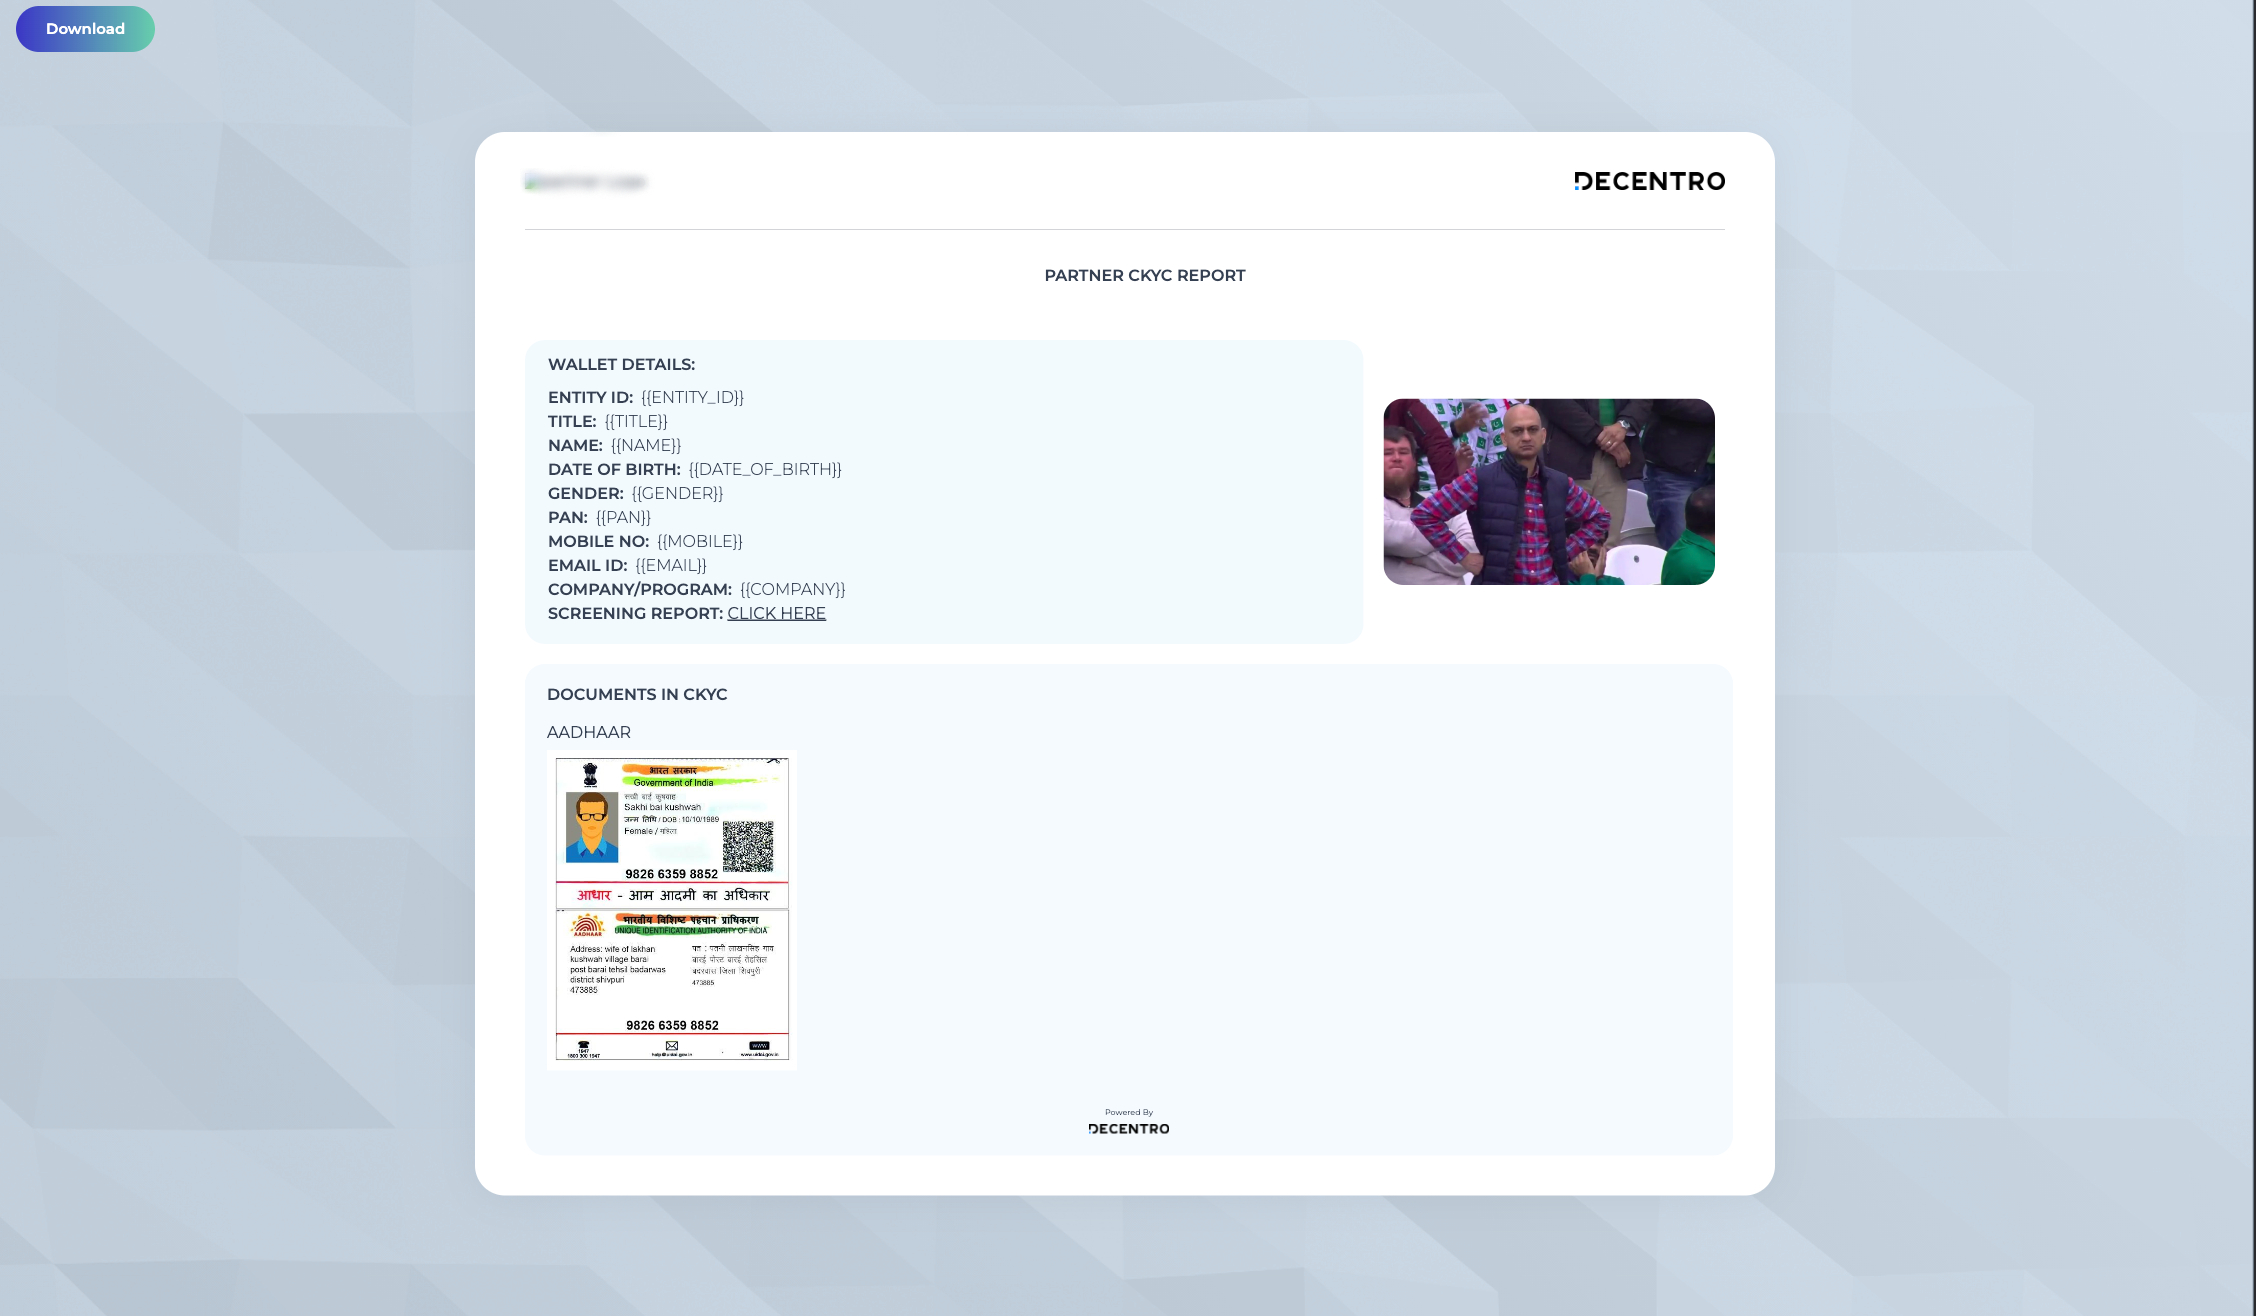
Output:

Above shown is the output of the template. Now comes the star of the show, jsPDF part
First, Set up jsPDF
To use jsPDF, you need to include the library in your HTML file. You can either download the library and include it locally, or you can include it directly from a CDN.
Here we will use the CDN to import the library, so let’s first add a couple of libraries at the head part of our template.
<script src="https://ajax.googleapis.com/ajax/libs/jquery/1.11.1/jquery.min.js"></script> | |
<script type="text/javascript" src="https://cdnjs.cloudflare.com/ajax/libs/jspdf/1.0.272/jspdf.debug.js"></script> | |
<script src="https://cdnjs.cloudflare.com/ajax/libs/html2canvas/0.4.1/html2canvas.js"></script> |
view rawjspdf-sample.html hosted with ❤ by GitHub
Then, we move on to attaching the onClick to Download Button
Now, Attach an onClick event with the Download button
<button id="button-pdf" onclick="downloadPDF()">Download</button> |
view rawjspdf-sample.html hosted with ❤ by GitHub
The download button is linked with an onClick event which calls the downloadPDF function.
Finally, Download the HTML as a PDF
We will be creating a new jsPDF object. This can be done by calling the jsPDF constructor.
function downloadPDF() { | |
var pdf = new jsPDF('p', 'pt', 'a4'); | |
$("#button-pdf").attr('hidden', 'true') | |
pdf.addHTML($("#mainContainer"), 0, -20, { allowTaint: true, useCORS: true, pagesplit: false }, function () { | |
pdf.save('{{downloaded_file_name}}.pdf'); | |
$("#button-pdf").removeAttr('hidden', 'true') | |
}); | |
} |
view rawjspdf-sample.html hosted with ❤ by GitHub
The constructor function of the jsPDF class takes an object as a parameter with the following three properties:
Orientation – Defines the orientation of the PDF document. In this case, it is set to “portrait” – ‘p’
Unit – Sets the unit of measurement for the document. It is set to points (“pt”) in this case.
Format – Sets the size of the document. It takes an array with two values: the width and height of the unit specified in the unit property. In this case, we have set it to a standard A4-size document.
Now, we will be adding content to the PDF object & try downloading the PDF
<Code here will be linked using Github Gist link – while editing the blog on wordpress>
The addHTML method of the PDF object is called, passing in the following parameters:
$(“#mainContainer”) – a jQuery object representing the HTML element to be added to the PDF.
0 – the horizontal position (in millimeters) to place the element. In this case, it is positioned at the leftmost edge of the page.
-20 – the vertical position (in millimeters) to place the element. In this case, it is shifted by 20 millimeters to accommodate margins or headers.
{ allowTaint: false, useCORS: true, page split: false } – an optional object containing settings for rendering the HTML element.
The allowTaint property controls whether to allow the browser to taint the canvas when rendering images.
The useCORS property controls whether to use CORS (Cross-Origin Resource Sharing) when rendering images.
The pagesplit property controls whether to split the PDF into multiple pages if the HTML element overflows the current page.A callback function is executed after adding the HTML to the PDF. In this case, the save method of the PDF object is called to save the PDF file with the name {{downloaded_file_name}}.pdf.
Then, the “hidden” attribute of the HTML button with the ID “button-pdf” is removed to display the PDF download button.
Uploading the HTML file in the bucket

Created an S3 bucket again in AWS & uploaded the template in an object.
Copy the Object URL because this is where the template is rendered now.
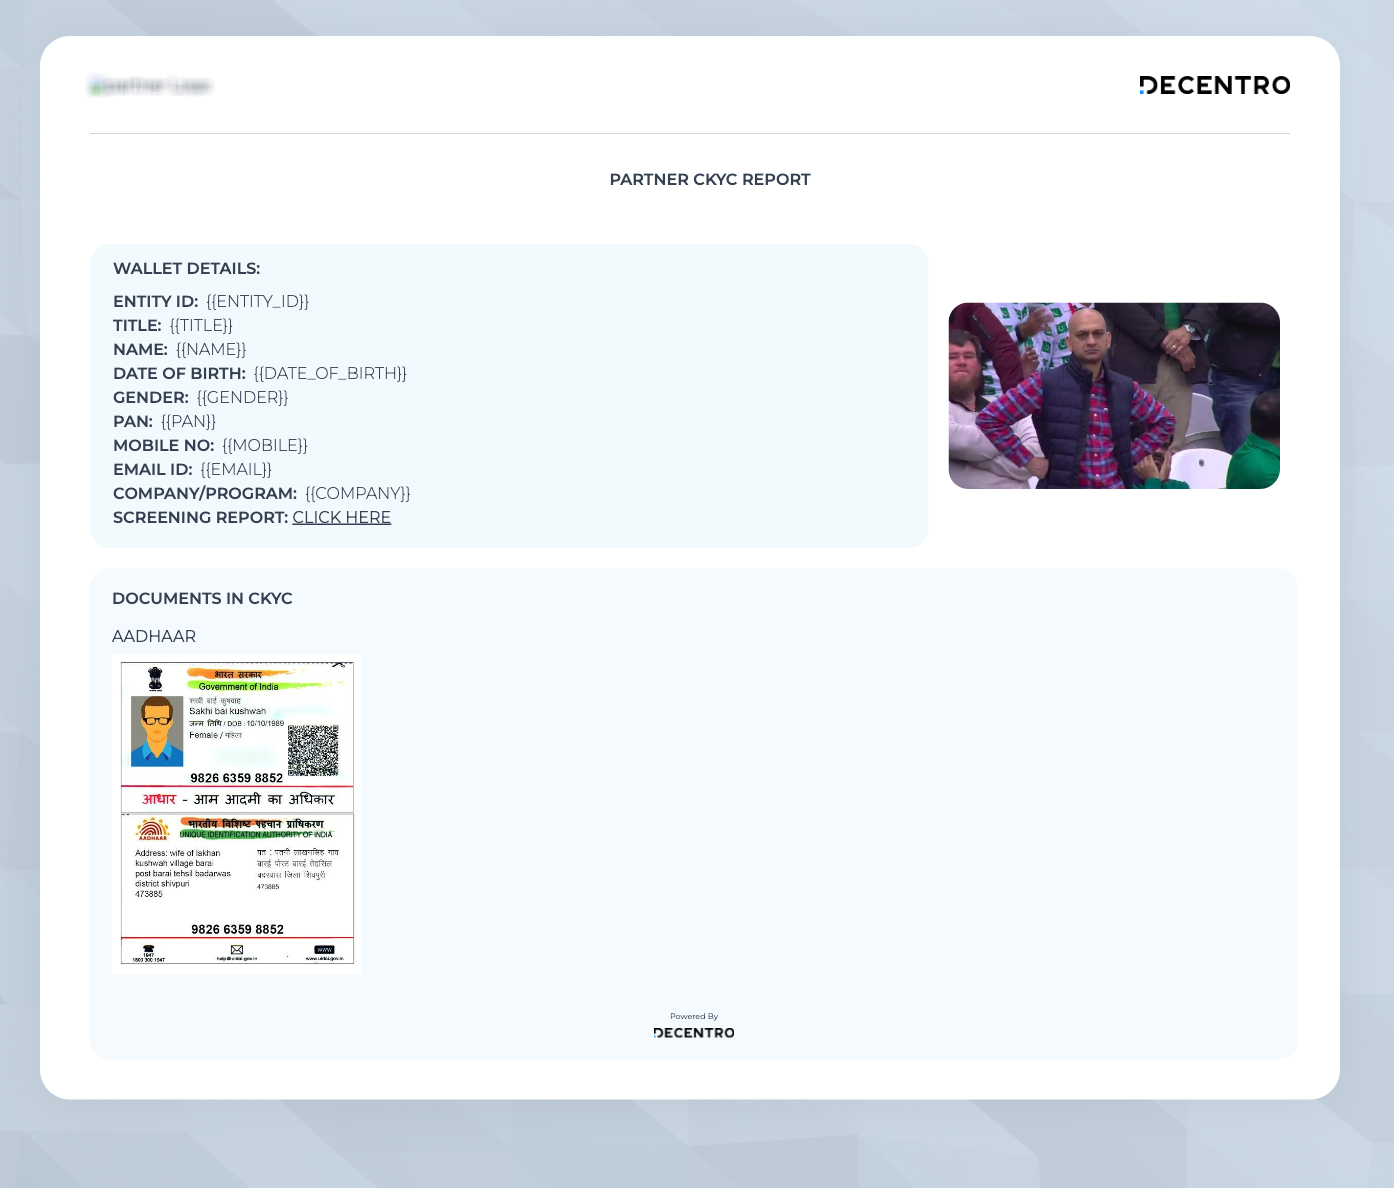
Now as we open the link and HIT Download….
FINAL REVEAL IN 3..2….1

Picture-perfect PDF is what I like to call it.
Now for the BONUS CONTENT
Hold on! Hold on! We have got some BONUS content for you. As mentioned earlier, the idea here is to emulate the killing of two birds with the one-stone analogy. Let us show you how
Say I have a screening report link too in the template, which, when clicked, opens in a new tab and holds a screening report PDF.
The idea is to download both these reports simultaneously by clicking the download button once.
Can this be done?
Well, of course, YES!
To achieve this, let’s add more <CODE> to the existing one.
<p> | |
<strong class="font-sub-heading-color-size">SCREENING REPORT: </strong><span | |
class="font-size-for-value"><a class="screening-report-url" | |
href="https://www.africau.edu/images/default/sample.pdf" target="_blank">CLICK | |
HERE</a></span> | |
</p> |
view rawjspdf-sample.html hosted with ❤ by GitHub
Now as we can see, If we click the link directly, it opens up in a new tab and displays a PDF file
Downloading both PDFs simultaneously
Let’s update our js code to the below code snippet to achieve both reports being downloaded on a single download button click
function saveAspdf() { | |
var pdf = new jsPDF('p', 'pt', 'a4'); | |
$("#button-pdf").attr('hidden', 'true') | |
pdf.addHTML($("#mainContainer"), 0, -20, { allowTaint: true, useCORS: true, pagesplit: false }, function () { | |
pdf.save('{{downloaded_file_name}}.pdf'); | |
downloadFile($(".screening-report-url").attr("href")); | |
$("#button-pdf").removeAttr('hidden', 'true') | |
}); | |
} | |
function downloadFile(url) { | |
fetch(url, { method: 'get', mode: 'no-cors', referrerPolicy: 'no-referrer' }) | |
.then(res => res.blob()) | |
.then(res => { | |
const aElement = document.createElement('a'); | |
aElement.setAttribute('download', "screening_report.pdf"); | |
const href = URL.createObjectURL(res); | |
aElement.href = href; | |
aElement.setAttribute('href', href); | |
URL.revokeObjectURL(href); | |
}); | |
}; |
view rawjspdf-sample.html hosted with ❤ by GitHub
The downloadFile function downloads a PDF file from the specified URL using the fetch API and creates an anchor element with the download attribute to save the file.
Within the downloadFile function:
fetch(url, { method: ‘get’, mode: ‘no-cors’, referrerPolicy: ‘no-referrer’ }) fetches the PDF file from the specified URL using the GET method and the “no-cors” mode.
.then(res => res.blob()) converts the response to a Blob object.
.then(res => {…}) creates an anchor element with the download attribute, sets the href attribute to the URL of the Blob object, and simulates a click on the anchor element to download the file.
URL.revokeObjectURL(href) releases the Blob object URL.
That’s it; we have achieved what we set out to do: generate and download a PDF file using an HTML template.
So the ever-pertinent question must be addressed at the end of such deployments.
What’s next?
Since we can see the two PDFs, one being generated from HTML & one downloaded via an URL, are downloaded separately, we are now working towards downloading them in a single ZIP file as a wrapper to be shipped to customers.
More on that later.
Till then, feel free to indulge in the other works of the developers at Decentro, who are incessantly working on getting their subject matter expertise to you via these technical write-ups. Feel free to check out our blogs on multiple topics like NextJS, Jest, Metabase, and more.
That’s all with this blog. Until then, Keep snacking and keep learning!
Also, if you wish to connect with us, please drop us a line.
